 Leo
I always assumed recipes with the word “magic” in the title were just lying to get clicks. Baking is chemistry, not a magic trick. You put a liquid batter into a hot box, and it turns into a solid sponge. That is just how the rules of the kitchen work.
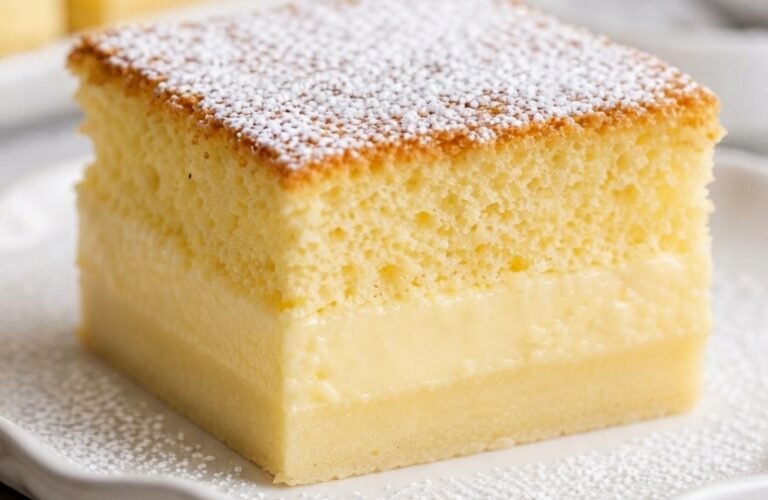
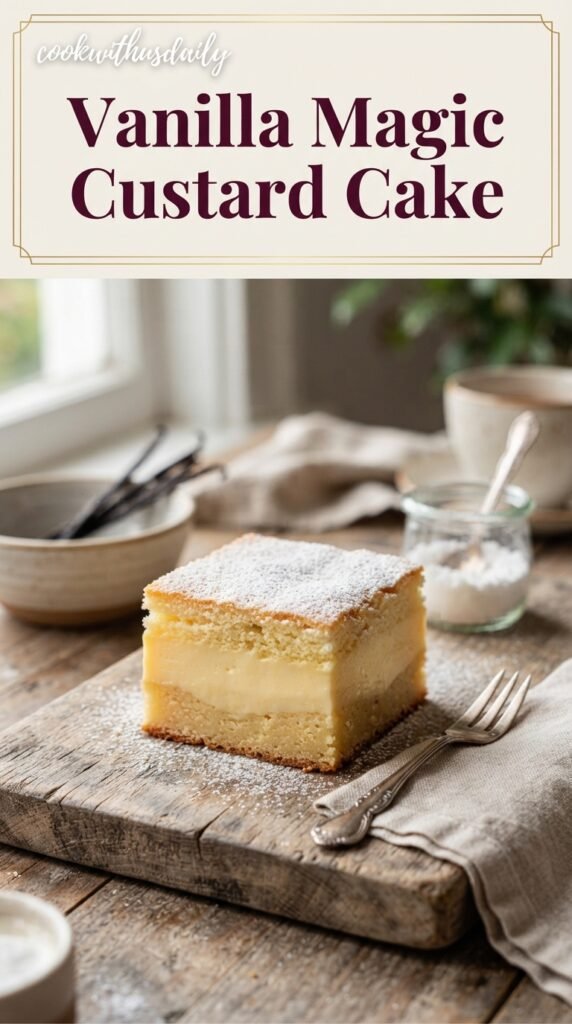
But this Vanilla Magic Custard Cake actually breaks the rules. You make one single, incredibly weird, watery batter. You pour it into a pan. You bake it. When you pull it out and cut into it, it has completely separated itself into three distinct layers: a dense, fudgy crust on the bottom, a soft, creamy custard in the middle, and a light, airy sponge cake on top.
I made this for a neighborhood dinner party last month, and I spent twenty minutes trying to convince my neighbor Dave that I did not bake three separate recipes and stack them together. He thought I was messing with him. I wasn’t. It really just does that on its own.
The secret is all in the egg whites and the oven temperature. By whipping the egg whites into stiff peaks and folding them into a very thin, milk-heavy batter, the heavy stuff sinks, the light stuff floats, and the center stays creamy.
If you like recipes that look like you spent hours on them but actually take about twenty minutes of active work, you need to try this. It sits in the same lazy-but-impressive category as my Lemon Cobbler Magic Recipe. If you want a custard-style dessert but absolutely refuse to turn your oven on this week, go make my No-Bake Sugar-Free Peanut Butter Pie instead.
🪄 Bake Time · 3 Layers · 1 Pan
Prep time: 20 min · Bake time: 50 min · Chill time: 2 hrs · Calories: 210 kcal
The Right Tools for the Job
This recipe is simple, but it is extremely picky about the equipment you use. If you try to swap pans or skip the parchment, you will end up with a mess that you have to eat with a spoon.
The Pan: You need an 8×8 inch square baking pan. Not a 9×9. Not a round cake pan. If you use a pan that is too big, the batter spreads out too thin and you lose the middle custard layer entirely. It will just bake into a flat, rubbery sponge. Stick to the 8×8.
The Paper: Do not just butter the pan. This cake is essentially a giant custard, which means it is incredibly sticky. If you don’t line the pan with parchment paper, leaving enough overhang on the sides so you can lift the cake out later, you will never get this out in one piece. You will be scraping vanilla mush out of the corners of your pan for days.
The Mixer: You need an electric hand mixer or a stand mixer. You have to beat the egg whites until they hold stiff peaks. If you try to do this by hand with a whisk, your arm will literally give out before the eggs are ready.
The Ingredient Lineup

For one 8×8 pan (about 9 squares):
- 4 large eggs, room temperature (separated into yolks and whites)
- 3/4 cup granulated sugar
- 1/2 cup (1 stick) unsalted butter, melted and slightly cooled
- 1 tablespoon vanilla extract
- 3/4 cup all-purpose flour
- 2 cups whole milk, lukewarm
- Powdered sugar, for dusting
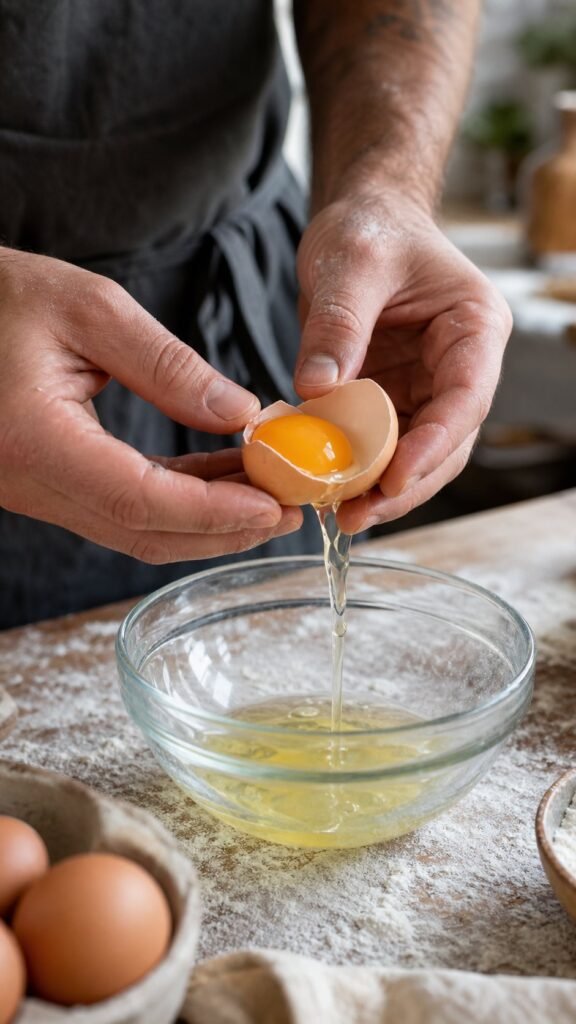
The Eggs: They must be at room temperature. Cold egg whites take forever to whip and don’t get nearly as fluffy. Also, separate them carefully. If even a tiny speck of egg yolk gets into your bowl of egg whites, they will refuse to whip.
The Milk: It has to be lukewarm. Not cold from the fridge, and not boiling hot. If you pour cold milk into this batter, it will instantly solidify the melted butter into disgusting little greasy chunks. Heat the milk in the microwave for about 45 seconds until it feels like warm bathwater.
The Vanilla: Because this is a vanilla cake, you actually taste the extract. This is the time to use the good, real vanilla extract, not the imitation stuff that smells like cheap perfume.
Mix, Fold, Pour
1. Separate and whip the whites.
Start by separating your eggs. Put the whites into a spotlessly clean bowl. Use your electric mixer to beat them until they form stiff peaks. When you lift the beaters straight up, the egg whites should stand up like little mountains and not flop over. Set this bowl aside.
2. Beat the yolks and sugar.
In a separate, larger bowl, beat the 4 egg yolks and the granulated sugar until the mixture turns very pale yellow and falls off the beaters in a thick ribbon. This takes about two minutes. Don’t rush it.
3. Add the wet ingredients.
Pour in the melted (but slightly cooled) butter and the vanilla extract. Beat it for another 30 seconds until it’s combined.
4. Add the flour and milk.
Add the flour and mix it in on low speed just until you can’t see dry white powder anymore. Then, slowly pour in your lukewarm milk while mixing on low.
Here is the thing no one warns you about: the batter is going to look completely wrong right now. It is going to look like watery pancake batter. Don’t panic. That is exactly what it is supposed to look like.
5. The Egg White Fold.
Take your bowl of stiff egg whites and dump about a third of them into the watery batter. Gently whisk them in to lighten things up. Then, switch to a spatula. Add the rest of the egg whites and gently fold them in.
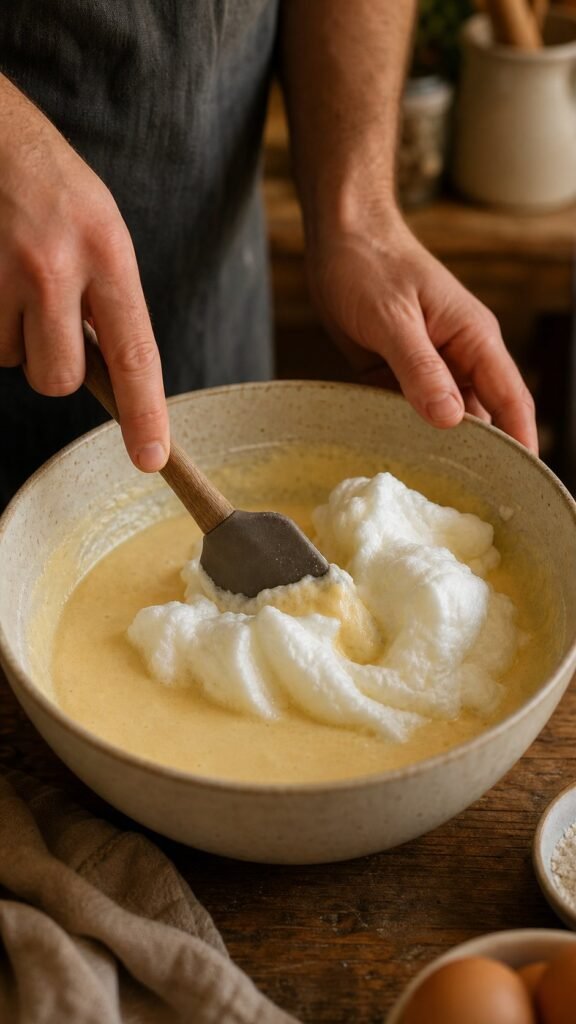
Stop mixing before it looks smooth. You actually want big, visible white clumps of egg whites floating on top of the liquid batter. If you mix until the batter is perfectly smooth, you destroy all the air you just whipped into the whites. No air means no sponge layer on top.
6. Pour and bake.
Pour the lumpy, weird-looking batter into your parchment-lined 8×8 pan.
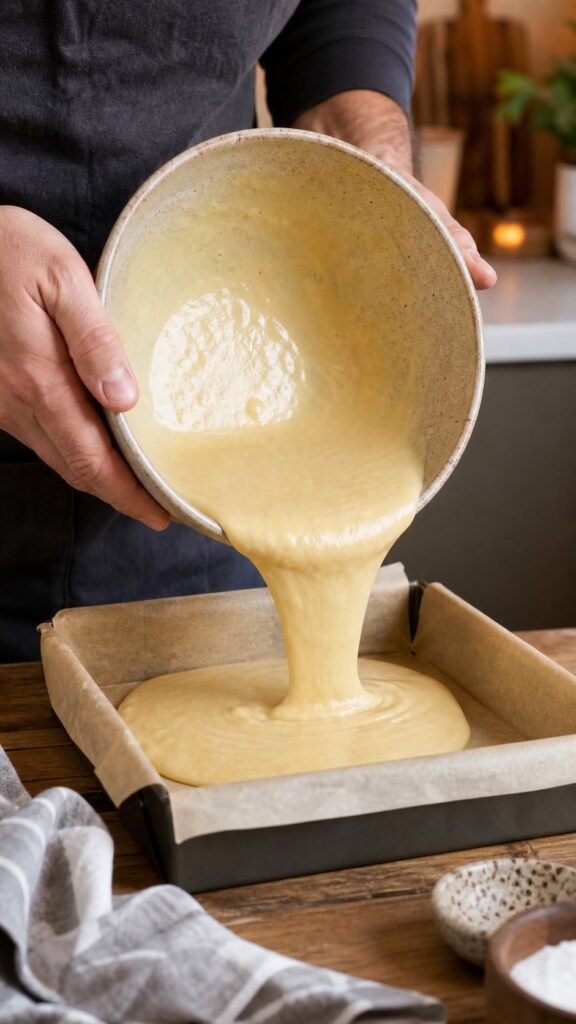
Bake it at 325°F (160°C) for 45 to 55 minutes. You are looking for the top to be golden brown. The center of the cake should still jiggle like a firm bowl of Jell-O when you shake the pan. If it doesn’t jiggle at all, you overbaked it and ruined the custard layer.
7. The Mandatory Chill.
Pull it out of the oven. You cannot eat it right now. If you cut into this cake while it is hot, it will collapse into a puddle of vanilla soup. Let it cool on the counter until the pan is safe to touch, then put the whole pan in the fridge for at least 2 hours to let the custard set up.
What I Got Wrong First
The first time I made this, I completely ignored the milk temperature. I grabbed a jug of cold milk straight out of the fridge and poured it right into the batter. Within three seconds, the melted butter reacted with the cold milk and turned into hundreds of tiny, hard, yellow butter pellets. The cake baked into a greasy, dense brick. Lesson learned: microwave your milk.
My second mistake was overmixing the egg whites. I kept folding and folding because I thought the batter was supposed to look smooth like a normal cake. By the time I put it in the oven, all the air was gone. It tasted good, but the top layer was completely flat. You have to accept that the batter will look like a curdled, lumpy mess when it goes into the oven.
Quick Cake Troubleshooting
Why didn’t my cake separate into three layers?
You either overmixed the egg whites into the batter (killing the top sponge layer), or you baked it in a pan that was too large (killing the middle custard layer).
Why is my cake totally liquid in the middle?
Every oven runs differently. If your cake is literal soup after chilling in the fridge for two hours, your oven runs cold and you underbaked it. Next time, leave it in for an extra 10 minutes. The top should be deeply golden and the jiggle should be tight, not sloshy.
My cake cracked on top, is it ruined?
No. It usually cracks a little bit as it cools and shrinks down. That is exactly what the powdered sugar dusting is for. It hides all sins.
Make-Ahead Baking Schedule
This is arguably the best dinner party dessert in existence because you have to make it ahead of time. You cannot rush the chill step.
The Day Before: Make the batter, bake the cake, and let it cool. Cover the pan tightly with plastic wrap and leave it in the fridge overnight. It actually slices significantly better and tastes creamier on day two.
Right Before Serving: Grab the parchment paper overhang and lift the whole block of cake out of the pan and onto a cutting board. Use a sharp, non-serrated knife to cut it into squares. Wipe the blade of your knife clean with a damp paper towel between every single cut. If you don’t wipe the knife, the sticky custard will drag across the sponge and ruin the clean look of the layers. Dust heavily with powdered sugar right before you hand out the plates.
Variations and Tweaks
Lemon Magic Cake: Add the zest of two whole lemons and two tablespoons of fresh lemon juice to the batter when you add the vanilla. It turns it into a bright, citrusy custard that tastes incredible in the summer.
Espresso: Add a tablespoon of instant espresso powder to the warm milk before you mix it in. It gives the custard a latte-like flavor.
Berry Compote: Serve the slices with a spoonful of warm blueberry or raspberry jam on top. The tartness cuts right through the rich vanilla custard. If you have extra fruit sitting around from making my Fluffy Strawberry Cheesecake Pancakes, use it here.
Storing Leftovers
Because this cake is heavily milk and egg-based, it cannot sit on the counter. Keep leftovers in an airtight container in the fridge for up to 4 days.
Do not freeze this cake. The freezer destroys the texture of the custard layer. When it thaws out, it separates and becomes a watery, granular mess. Just eat it from the fridge. It goes great with a cup of black coffee the next morning. If you want a dessert you can throw in the freezer for months, stick to something sturdy like my Caramel Crush Bars.
Vanilla Magic Custard Cake
One watery, lumpy batter goes in — fudgy base, silky vanilla custard middle, and airy sponge top come out. No separate layers to stack, just stiff egg whites and a tight jiggle.
Ingredients 01
After you add the lukewarm milk, the batter is watery like thin pancake batter with lumpy egg-white islands on top. Do not add more flour. That thin batter is how the heavy custard sinks and the light sponge floats. If you smooth it out, you kill the magic.
As an Amazon Associate, we may earn from qualifying purchases. Click any ingredient name to shop it on Amazon — no extra cost to you.
How to Cook 02
Separate 4 eggs while cold (easier), then let whites come to room temp — bowl spotlessly clean, no speck of yolk. Beat with electric mixer until stiff peaks: lift beaters, peaks stand like little mountains, don’t flop. Set aside. If you whisk by hand, your arm will give out.
In a larger bowl, beat 4 yolks + ¾ cup sugar about 2 minutes until very pale yellow and falling in a thick ribbon off beaters. Don’t rush — this is your structure.
Pour in 113g melted slightly-cooled butter + 1 Tbsp vanilla. Beat 30 seconds until combined. Butter should not be hot.
Add 95g flour on low speed just until no dry white powder shows. Then slowly pour 2 cups lukewarm milk (microwave ~45 sec — warm bathwater, not cold, not hot) while mixing on low. Batter will look thin and watery — that’s perfect.
Whisk in ⅓ of the stiff whites to lighten the thin batter. Switch to a spatula, add remaining whites and gently fold. Stop before smooth — you want big visible white clumps floating on top. Smooth = you knocked out the air = flat top, no sponge layer.
Line 8×8 inch square pan with parchment, leaving overhang on sides to lift later. Pour lumpy batter in. Bake at 325°F (160°C) 45–55 min until top is deeply golden brown. Center should still jiggle like firm Jell-O when shaken — tight, not sloshy. No jiggle = overbaked, custard gone.
Cool on counter until pan is safe to touch, then fridge at least 2 hours (overnight is even better). Hot-cut = vanilla soup collapse. Lift out via parchment, cut into 9 squares with a sharp non-serrated knife, wiping blade clean with a damp towel between cuts so custard doesn’t drag. Dust heavily with powdered sugar right before serving.
Notes 03
8×8 only — not 9×9, not round. Larger pan spreads batter thin and erases the custard layer into flat rubbery sponge. Line with parchment + overhang — butter alone won’t release this giant custard. You’ll be scraping vanilla mush for days.
Room temp + spotless bowl + no yolk speck or they won’t whip. Stiff peaks mean peaks stand straight up. First whisk ⅓ in, then spatula-fold the rest. If you fold till smooth, you just destroyed the sponge top.
Microwave milk ~45 sec to bathwater warmth. Cold milk instantly solidifies melted butter into hundreds of hard yellow pellets → dense greasy brick. Boiling hot curdles eggs. Lukewarm is the tightrope.
Flat top? You overmixed whites — left no air. No custard? Pan too big or overbaked till no jiggle. Top should be golden, center tight Jell-O jiggle. Every oven differs — if fridge-set is still soup, bake +10 min next time.
Lemon: zest 2 lemons + 2 Tbsp juice with vanilla. Espresso: dissolve 1 Tbsp instant espresso in warm milk. Berry compote: warm blueberry/raspberry jam spooned on top — perfect if you have fruit from Fluffy Strawberry Cheesecake Pancakes.
Best made a day ahead — cover baked, cooled pan tightly, fridge overnight; slices cleaner and creamier day two. Keep airtight fridge 4 days max (milk + egg). Never freeze — thawed custard splits into watery grains. Want freezer-friendly? Make Caramel Crush Bars instead.
Nutrition 04
| Nutrient | Per Square (1 of 9) |
|---|---|
| Calories | 210 kcal |
| Protein | 4 g |
| Carbohydrates | 22 g |
| Fats | 11 g |
| Fiber | 0 g |
| Sugar | 16 g |
One 8×8 pan cut into 9 squares. Estimated — varies with butter and milk. Best inverted from fridge after 2-hour (or overnight) chill.
Allergens: egg, dairy (milk, butter), wheat (flour). Contains vanilla.
Magic cousins & no-bake backup: Lemon Cobbler Magic Recipe · No-Bake Sugar-Free Peanut Butter Pie · Fluffy Strawberry Cheesecake Pancakes · Caramel Crush Bars