 Leo

Last summer, I promised my kids we would make s’mores in the backyard fire pit. We bought the ingredients, built the fire, and exactly four minutes later, a massive thunderstorm rolled in and destroyed everything. We ended up sitting at the kitchen table trying to roast marshmallows over a gas stove burner with barbecue skewers. It was a chaotic, sticky nightmare.
I promised myself I would never do it again. I wanted the exact flavor of a toasted s’more, but I wanted it neatly contained in a baked square that I could eat on the couch while watching television.
That is how these OMG S’mores Bars came to be.
Most baked s’mores recipes fail because they tell you to use actual mini marshmallows. Real marshmallows are mostly gelatin. When you put them in an oven, they blow up like hot air balloons, instantly melt into a clear liquid, and then harden into a rubbery, impossible-to-chew crust when they cool.
The secret to a real, gooey, messy s’mores bar is using a jar of marshmallow fluff (marshmallow creme). Fluff does not contain gelatin. It bakes perfectly, puffs up, gets toasted on the edges, and stays aggressively gooey for days after you cut into it.
If you are a massive fan of layered cookie bars, you should absolutely put these right next to my Caramel Crush Bars or my Turtle Bars Recipe at your next barbecue. If you want a chocolate fix that isn’t quite as sticky, pivot to my Best Almond Flour Brownies. But if you want a ridiculously heavy, messy, campfire dessert without having to smell like woodsmoke? Grab a jar of fluff.
🏕️ Bake Time · Heavy Dessert · 16 Squares
Prep time: 20 min · Bake time: 25 min · Chill time: 2 hrs · Calories: 290 kcal
The Nutrition Breakdown
Let’s not kid ourselves. This is a graham cracker crust filled with liquid sugar and pure chocolate. It is a heavy-duty, indulgent dessert. Here is the estimated breakdown per square (assuming you cut an 8×8 pan into 16 pieces):
- Calories: 290
- Protein: 2g
- Carbohydrates: 41g
- Dietary Fiber: 1g
- Total Sugars: 28g
- Fat: 14g
- Saturated Fat: 8g
- Sodium: 160mg
You cannot make this sugar-free or low-fat. The sugar and the butter are literally the only things holding the crust together. Eat a square and enjoy your life.
The Marshmallow Fluff Warning
Marshmallow fluff (also called marshmallow creme) is a sticky, miserable ingredient to work with. It aggressively glues itself to spoons, bowls, and your hands.
If you try to scrape it out of the jar with a dry spoon and spread it over chocolate chips, you will rip the entire bottom crust out of your pan and ruin the bars.
The Grease Trick: Before you even open the jar of fluff, spray your rubber spatula heavily with non-stick cooking spray. If you don’t have spray, rub a tiny bit of butter on your fingers. The grease acts as a shield, and the fluff will slide right off the spatula and onto the chocolate without sticking.
The Right Tools for the Job
The Pan: Use an 8×8-inch light-colored metal baking pan. Do not use a glass dish. Glass retains too much residual heat, and the heavy sugar content in these bars will cause the bottom graham cracker crust to burn into a rock-hard plate.
The Sling: Parchment paper is mandatory. Marshmallow fluff turns into superglue in the oven. If it touches bare metal, you will be chiseling the bars out of the pan. Line the pan with parchment paper, leaving a long overhang on the sides so you can lift the entire block out like a hammock when it is cool.
The Ingredient Lineup

The Graham Cracker Crust & Topping:
- 2 cups graham cracker crumbs (about 14 full sheets, crushed)
- 1/2 cup (1 stick) unsalted butter, melted
- 1/3 cup packed light brown sugar
- 1/2 teaspoon fine salt
The S’mores Filling:
- 1 1/2 cups milk chocolate chips (or semi-sweet, if you prefer it less sweet)
- 1 full jar (7 oz or 7.5 oz) marshmallow fluff/creme
The Chocolate: Traditional campfire s’mores use milk chocolate bars (like Hershey’s). If you want that exact, nostalgic, super-sweet flavor, buy milk chocolate chips. However, because marshmallow fluff is basically pure sugar, I actually prefer using semi-sweet or dark chocolate chips to cut through the extreme sweetness. It creates a much better balance.
The Crumbs: You can buy a box of pre-crushed graham cracker crumbs in the baking aisle to save time, or you can just put 14 whole graham cracker sheets into a Ziploc bag and beat them with a rolling pin until they turn to sand. Leave a few larger chunks in the bag for texture.
Mix, Press, Spread
1. Make the crust mixture.
Dump the graham cracker crumbs, dark brown sugar, and salt into a large bowl. Pour the hot melted butter directly over the top. Use a fork to toss it all together until it looks like wet sand.
2. Press the bottom layer.
Take exactly half of the wet crumb mixture and dump it into your parchment-lined 8×8 pan.
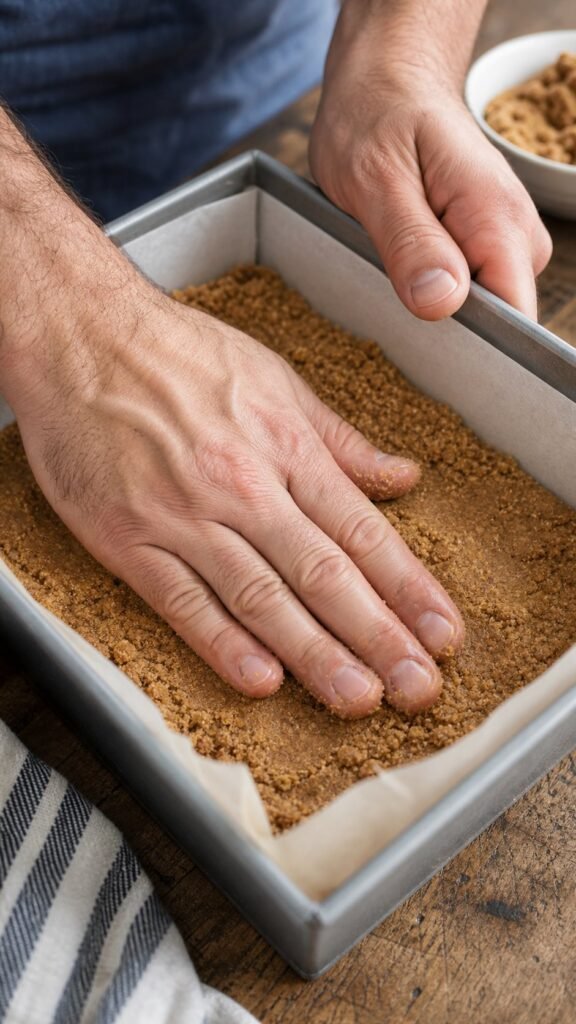
Use your hands or the flat bottom of a drinking glass to aggressively pack the crumbs down into a tight, solid layer. If you pack it loosely, the bars will crumble when you cut them.
3. Add the chocolate.
Sprinkle the chocolate chips in an even layer directly over the packed graham cracker crust.
4. The Fluff Struggle.
Remember the grease trick. Spray your rubber spatula (or your bare hands) with cooking spray. Scoop the entire jar of marshmallow fluff out and drop it in dollops over the chocolate chips.

Gently use your greased spatula or your greased fingers to press and spread the fluff into an even layer. Go slowly. If you push too hard, you will drag the chocolate chips around and rip up the crust.
5. The Top Layer.
Take the remaining half of your graham cracker crumb mixture. Squeeze it in your fist to create large, chunky clusters, and drop them evenly over the wet marshmallow fluff.
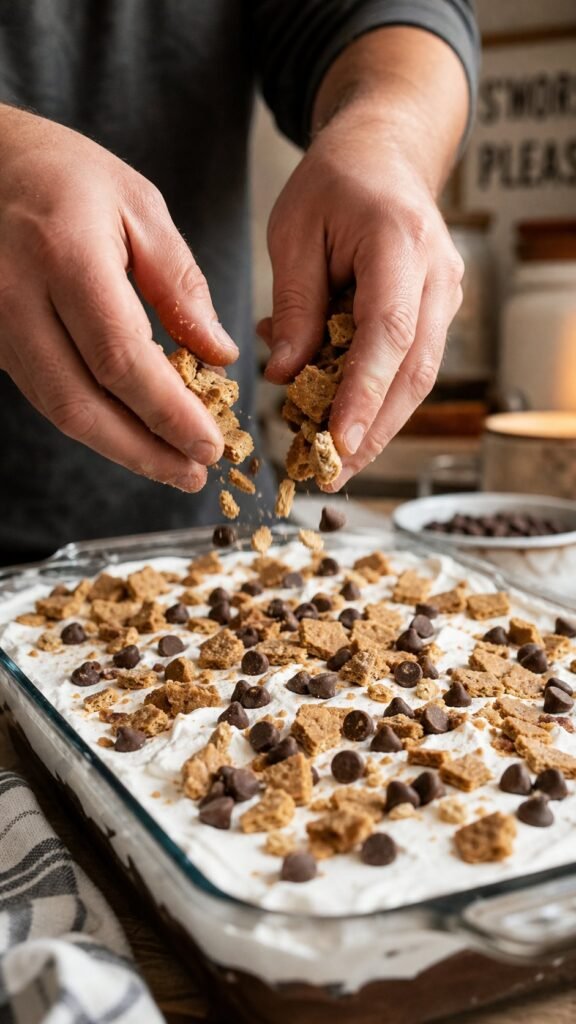
Leave some gaps so the white fluff can peek through and get toasted in the oven.
6. Bake.
Bake at 350°F (175°C) for 22 to 25 minutes. You want the marshmallow fluff that is poking through the top to look golden brown and toasted, just like a campfire marshmallow.
7. The Mandatory Chill.
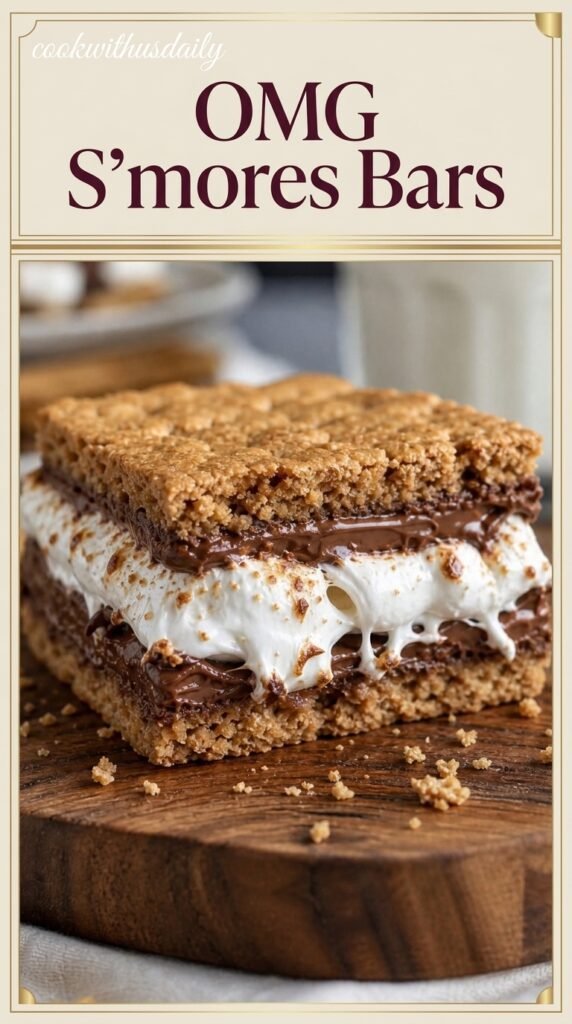
Pull the pan out of the oven. The inside is literally boiling lava. Do not try to cut these while they are hot, or the marshmallow fluff will completely run out the sides and you will be left with an empty shell. Let the pan cool on the counter for an hour, then put the entire pan in the fridge for at least two hours to solidify the chocolate and the fluff.
What I Got Wrong First
The first time I made these, I thought I was smarter than the recipe and used a bag of mini marshmallows instead of a jar of fluff. I baked them, and they looked incredible—massive, puffed-up, toasted marshmallows on top. Then they cooled. The gelatin in the marshmallows seized up, and the center of the bars turned into a rubbery mat that I literally could not cut with a chef’s knife. Use the jar of fluff. It stays gooey permanently.
My second mistake was skipping the parchment paper. I sprayed the pan heavily with baking spray and figured it would be fine. The marshmallow fluff bubbled up over the sides of the crust, hit the metal pan, and baked into an impenetrable cement. I had to eat the bars straight out of the pan with a spoon because they refused to release. Use the parchment paper sling.
Quick Bar Troubleshooting
Why did my bottom crust completely crumble?
You didn’t pack it down hard enough before baking, or you didn’t let the bars chill in the fridge before cutting. The melted butter needs to solidify in the cold fridge to lock the graham cracker crumbs together like glue.
My marshmallow fluff is tearing the crust apart!
You didn’t grease your spatula, or you dropped one massive blob of fluff in the dead center of the pan and tried to drag it to the edges. Next time, drop six or seven small dollops of fluff all over the pan. It is much easier to connect small dollops than it is to spread one giant mountain.
Can I make these in a 9×13 pan?
Yes, but you have to perfectly double every single ingredient. A single batch in a 9×13 pan will be incredibly thin, and the fluff will burn before the crust sets. Bake a doubled batch for about 25 to 30 minutes.
Make-Ahead Baking Schedule
Because of the high sugar content, these bars have a fantastic shelf life.
Up to 4 Days Before: Bake the bars completely, let them chill, and cut them into squares. You can store them in an airtight Tupperware container at room temperature. They actually taste better on day two because the graham cracker softens slightly against the marshmallow.
Storage Warning: Do not store these in the fridge long-term. While they need the fridge to initially set up so you can cut them cleanly, leaving them in the cold for three days will make the graham cracker crust turn soggy and stale. Keep them on the counter. I do not recommend freezing them, as the marshmallow fluff gets a very strange, grainy texture when it thaws out.
Variations and Tweaks
The Peanut Butter Cup S’more: Swap the milk chocolate chips entirely for chopped Reese’s Peanut Butter Cups. It is aggressively rich and tastes exactly like the chaotic peanut butter mixture in my Reese’s Chocolate Peanut Butter Earthquake Cake Recipe.
White Chocolate Macadamia: Use white chocolate chips instead of milk chocolate, and mix half a cup of chopped, salted macadamia nuts into the graham cracker crust.
The Rolo S’more: Drop a handful of unwrapped Rolo candies directly into the marshmallow fluff layer before you add the top crust. When you bake it, the caramel inside the Rolos melts into the fluff.
OMG S’mores Bars
Graham crust + milk chocolate + jarred marshmallow fluff (not gelatin marshmallows) — baked to toasted golden, chilled to clean slice. Messy campfire gone neat.
Ingredients 01
Never use mini marshmallows. Gelatin puffs, melts to clear liquid, then hardens to rubber you can’t cut. Fluff has no gelatin — puffs, toasts, stays aggressively gooey. And fluff is glue: spray spatula AND fingers with non-stick spray (or butter) before scooping — grease shield lets it slide off without ripping crust.
As an Amazon Associate, we may earn from qualifying purchases. Click any ingredient name to shop it on Amazon — no extra cost to you.
How to Cook 02
Dump 2 cups crumbs + ⅓ cup brown sugar + ½ tsp salt in large bowl, pour ½ cup hot melted butter over, toss with fork till wet sand.
Set half wet crumbs aside for topping. Dump remaining half into parchment-sling 8×8 light metal pan. With hands or flat-bottom glass pack aggressively to tight solid layer. Loose = crumbly bars.
Sprinkle 1½ cups chocolate chips in even layer over packed crust.
Grease spatula/fingers. Scoop entire jar, drop 6–7 small dollops over chocolate (don’t plop one mountain in center). Gently press/spread with greased spatula to even layer — go slow or you’ll drag chips and tear crust.
Squeeze remaining crumbs in fist to make large chunky clusters, drop evenly over fluff. Leave gaps so white fluff peeks through to toast.
Bake at 350°F (175°C) 22–25 min till fluff poking through is golden brown like campfire marshmallow. Don’t overbake or chocolate seizes.
Pull — inside is boiling lava. Cutting hot = fluff runs out, empty shell. Cool 1 hr on counter then fridge at least 2 hrs to solidify. Lift block via parchment sling, slice cold with sharp knife.
Notes 03
Mini marshmallows = rubber mat: baked gorgeous puff, cooled to gelatin-seized mat I couldn’t cut with a chef’s knife. Use jarred fluff — stays gooey. Skipped parchment: spray pan only — fluff bubbled to metal, baked to cement, ate with spoon. Parchment hammock is mandatory — fluff is superglue.
8×8 light metal, not glass. Glass holds heat; heavy sugar + butter burns bottom crust to rock-hard plate. Light metal heats evenly. Parchment overhang on both sides so you lift entire block.
Bottom crumbled? Didn’t pack tight or didn’t chill — butter must solidify cold to glue crumbs. Fluff tearing crust? Dry spatula + one giant blob dragged. Use greased spatula + 6–7 small dollops, connect them. 9×13? Must double every ingredient; single batch burns thin. Doubled 9×13 ≈ 25–30 min.
Up to 4 days: bake, chill, cut, store airtight at room temp — graham softens against marshmallow and tastes better day 2. Don’t fridge long-term (3 days = soggy) and don’t freeze (fluff thaws grainy). Need chill only for clean cut, then counter.
Peanut Butter Cup S’more: swap milk chips entirely for chopped Reese’s Peanut Butter Cups — aggressively rich like my Reese’s Chocolate Peanut Butter Earthquake Cake Recipe. White Chocolate Macadamia: white chips + ½ cup chopped salted macadamias in crust. Rolo S’more: drop unwrapped Rolos into fluff before top crust — caramel melts in.
Milk = nostalgic Hershey’s sweet (classic s’more). Semi-sweet/dark = balanced against pure-sugar fluff — my preference. Pre-crushed crumbs save time, or Ziploc + rolling pin to sand; leave a few bigger bits for texture.
Nutrition 04
| Nutrient | Per Square (1 of 16) |
|---|---|
| Calories | 290 kcal |
| Protein | 2 g |
| Carbohydrates | 41 g |
| Dietary Fiber | 1 g |
| Total Sugars | 28 g |
| Fats | 14 g |
| Saturated Fat | 8 g |
| Sodium | 160 mg |
8×8 pan cut into 16. Heavy indulgent — graham + butter + liquid sugar + chocolate. Sugar & butter hold crust; no sugar-free swap.
Allergens: wheat (graham crackers), dairy (butter, milk chocolate), egg (marshmallow fluff contains egg whites), soy (chocolate). Some fluff brands are gluten-free — check label. Contains peanuts if using Reese’s variation.
Explore more: Caramel Crush Bars · Turtle Bars Recipe · Best Almond Flour Brownies · Reese’s Chocolate Peanut Butter Earthquake Cake Recipe