 Leo
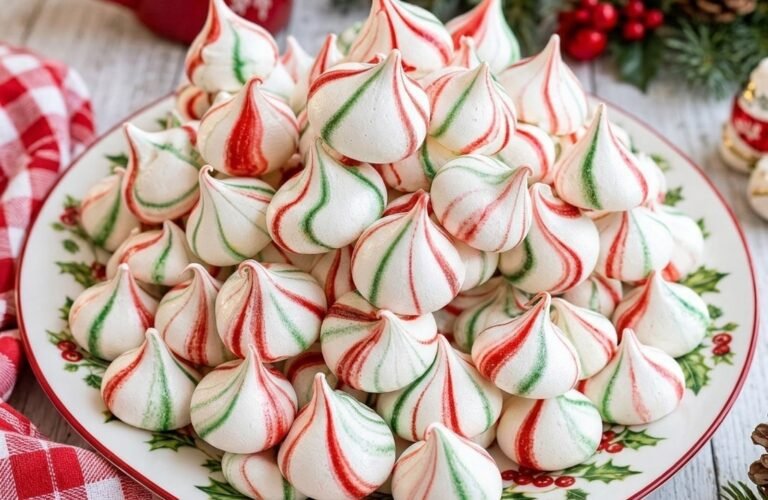
Christmas Meringue Kisses are the ultimate structural reset for your palate when you are completely exhausted by heavy, butter-logged holiday desserts. By the second week of December, everyone is sick of dense pound cakes and rich fudge. Meringues are literally just egg whites and sugar whipped into a cloud and dehydrated in an oven until they shatter like glass when you bite into them. They weigh nothing, they dissolve instantly on your tongue, and they visually command a dessert table with their bright, aggressive candy-cane stripes.
I use this recipe as a tactical palate cleanser. If you have been spending your time forcing massive amounts of heavy dairy into the Light Greek Yogurt Vanilla Cake, dealing with the dense fruit load of the Apple Cider Donut Bundt Cake Recipe Easy Fall Dessert Guide, or babysitting the molten core of the Gooey Brownie Pie, you need to step away from the butter. This recipe requires absolutely zero fat. If you have a bowl, a mixer, and patience, grab some eggs and let’s whip some air.
🎄 Bake Time · Holiday Candy · 40 Kisses
Prep time: 20 min · Bake time: 60 min · Calories: 15 kcal
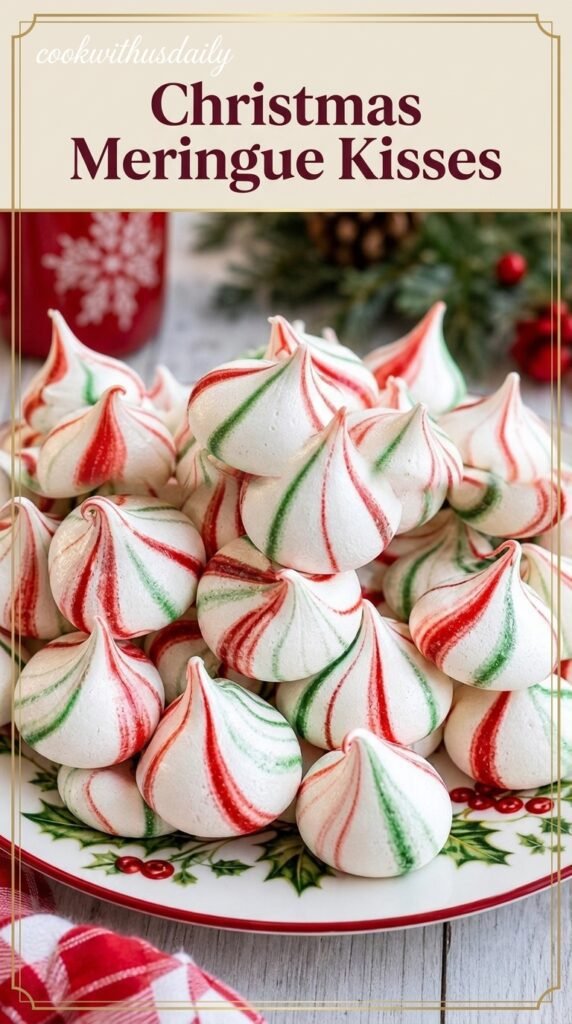
The Nutrition Breakdown
We are physically beating air into egg whites and stabilizing it with pure refined sugar. Because there is absolutely zero butter, oil, or flour in this recipe, it is technically a fat-free, gluten-free dessert. Here is the estimated breakdown per individual meringue kiss:
- Calories: 15
- Protein: 0g
- Carbohydrates: 4g
- Dietary Fiber: 0g
- Total Sugars: 4g
- Fat: 0g
- Saturated Fat: 0g
- Sodium: 5mg
Do not attempt to make this “healthy” by using a sugar substitute like Stevia or Erythritol. Meringue relies entirely on the chemical reaction between dissolving sugar crystals and egg proteins to build its structural walls. If you use a sugar substitute, the egg whites will never hold a peak. They will collapse into a runny, weeping puddle of egg water in your oven.
The “Grease-Free” Mandate
This is the single most critical rule of making meringue. If you ignore this, you will fail before you even turn the mixer on.
Egg whites are violently allergic to fat. If a single drop of egg yolk (which is pure fat), or a microscopic smear of butter, or residual grease from yesterday’s dinner touches the egg whites, they will physically refuse to whip. You can beat them for an hour, and they will just sit there as a frothy soup.
You absolutely cannot use a plastic mixing bowl. Plastic is porous and traps grease permanently. You must use a glass or metal bowl. Before you crack a single egg, take a paper towel, dip it in white vinegar or lemon juice, and aggressively scrub the inside of the bowl and the beaters of your mixer. The acid strips away any hidden fat molecules, guaranteeing a flawless, stiff meringue.
The Ingredient Lineup
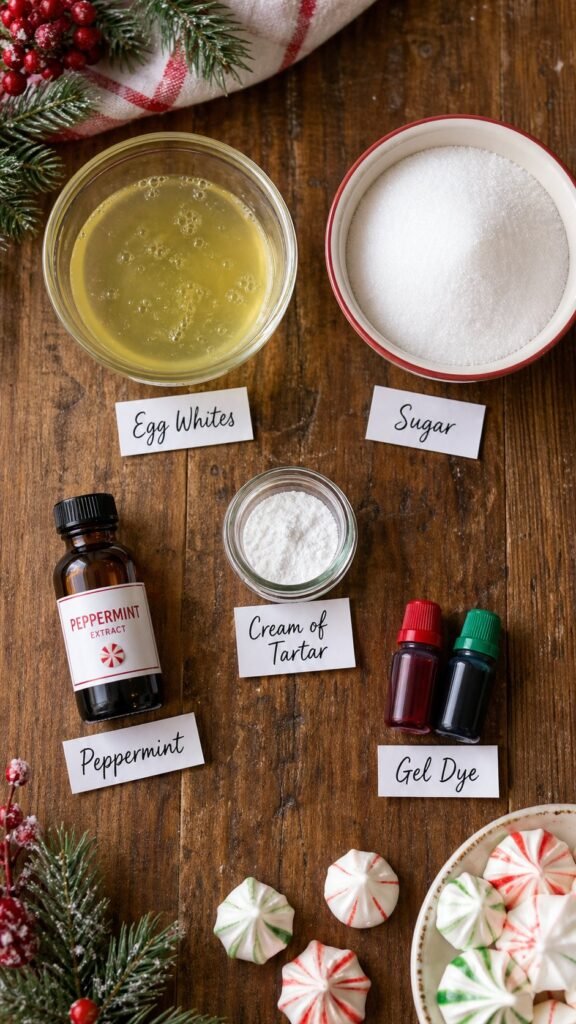
The Cloud Base:
- 4 large egg whites, room temperature (must be separated from fresh eggs)
- 1 cup superfine caster sugar (or granulated white sugar)
- 1/2 teaspoon cream of tartar
- 1/2 teaspoon pure peppermint extract (do NOT use mint extract)
- A tiny pinch of fine sea salt
The Striped Paint:
- Red and Green Gel Food Coloring (do NOT use liquid drops)
The Carton Egg Warning: You absolutely cannot use those convenient cartons of liquid egg whites from the grocery store. Carton egg whites are heavily pasteurized. The heat from the pasteurization process destroys the protein structure needed to trap air. They will foam up slightly, but they will never reach stiff, glossy peaks. You must crack and separate real, whole eggs by hand.
Clean, Whip, Paint, Bake
1. The Vinegar Scrub.
As mandated above, aggressively scrub your glass or metal mixing bowl and your whisk attachments with a paper towel soaked in white vinegar. Dry it completely with a clean towel.
2. The Initial Whip.
Preheat your oven to 225°F (105°C). Line two large, heavy metal baking sheets with parchment paper.
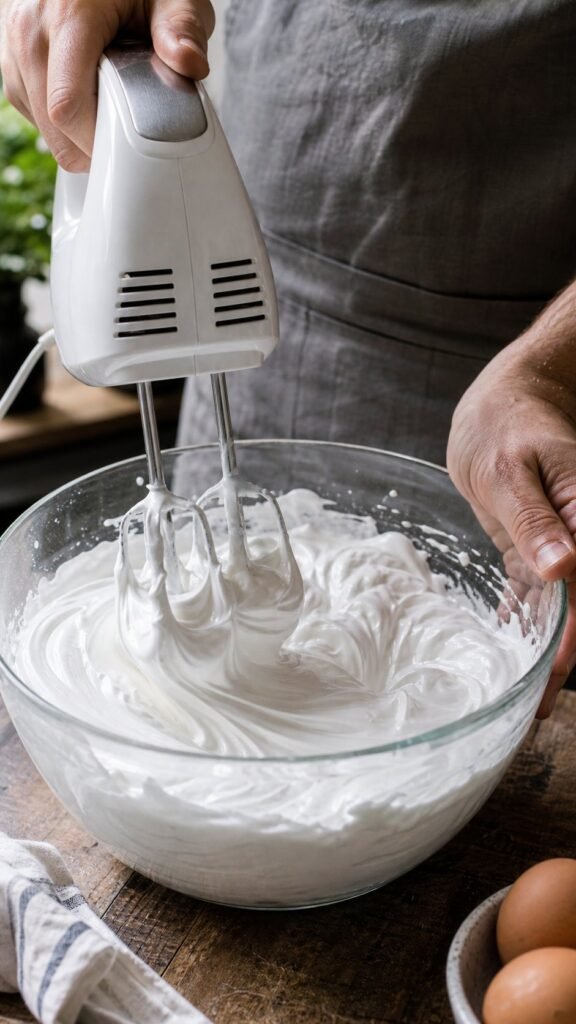
Pour your room-temperature, freshly separated egg whites into the pristine bowl. Add the cream of tartar and the pinch of salt. Use your electric mixer on medium speed to beat the egg whites until they become frothy and completely opaque white.
3. The Slow Sugar Feed.
Do not dump the cup of sugar in all at once. If you do, the weight of the sugar will crush the air bubbles.
Turn the mixer up to medium-high. Add the sugar exactly one tablespoon at a time, letting it beat for about 15 seconds before adding the next spoonful. This slow feed allows the sugar crystals time to physically dissolve into the egg whites. Once all the sugar is in, add the peppermint extract. Turn the mixer to high and violently beat it for 5 to 7 minutes. It must form thick, dense, incredibly glossy stiff peaks that stand straight up when you pull the whisk out.
4. Paint the Bag.
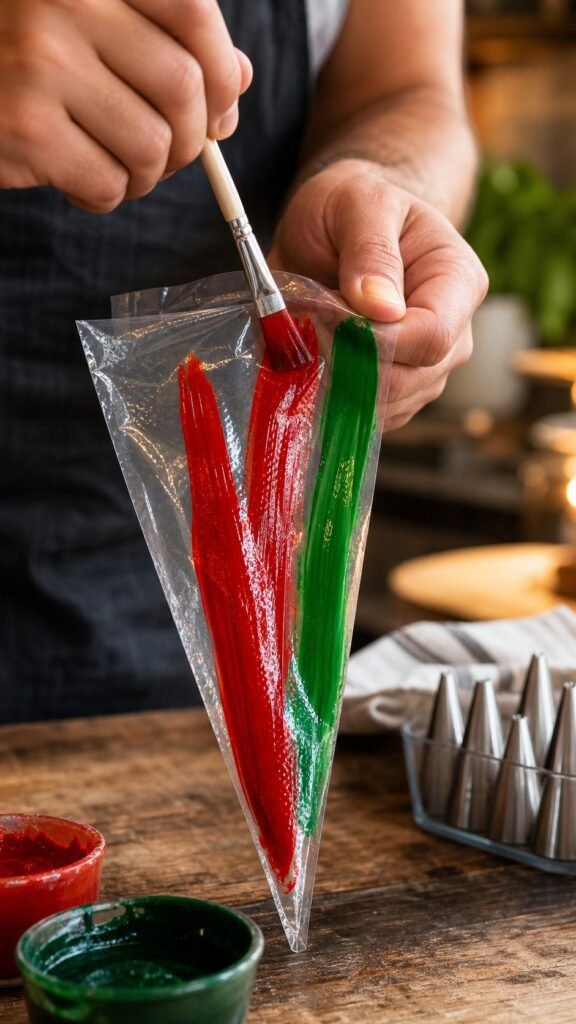
Take a clear plastic piping bag and fit it with a large star tip (like a Wilton 1M). Fold the top of the bag over your hand. Take a small, clean food-safe paintbrush (or a wooden skewer), dip it into the red gel food coloring, and forcefully paint two thick stripes straight down the inside walls of the bag. Do the same with the green gel dye.
5. The Pipe.
Use a rubber spatula to gently scoop the stiff white meringue into the painted piping bag. Do not overfill it.
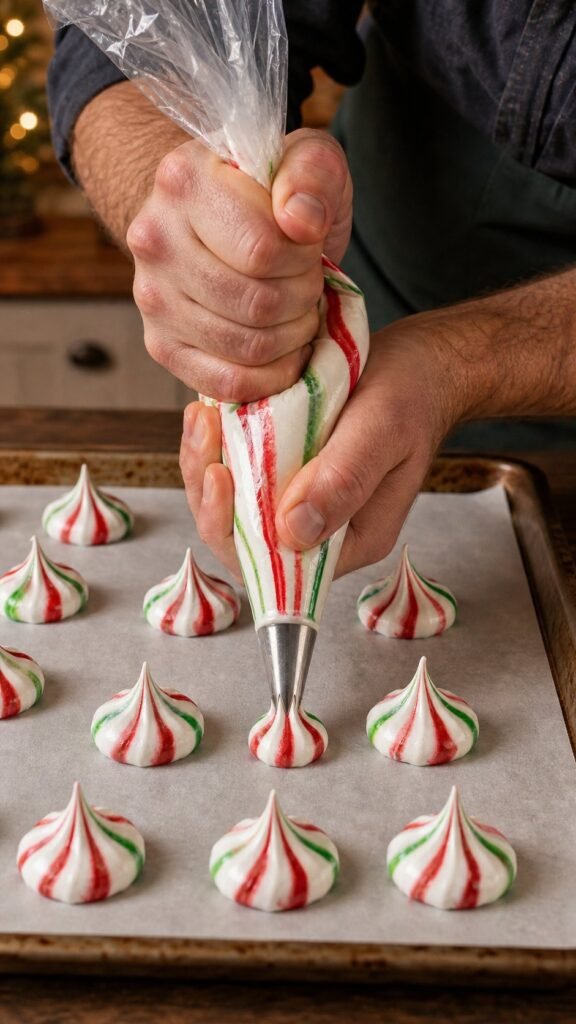
Hold the bag perfectly vertical over your parchment paper. Squeeze the bag forcefully until a 1-inch wide star forms on the paper, push down slightly, and then pull straight up to create a sharp, pointed kiss. The white meringue will drag the red and green dye out of the bag as you pipe, creating flawless candy-cane stripes.
6. The Dehydration.
Put the pans into the 225°F oven. You are not really baking these; you are dehydrating them. Let them bake for exactly 60 minutes. Do not open the oven door.
After 60 minutes, turn the oven completely off. Leave the pans sitting inside the closed, cooling oven for another hour. This prevents the delicate shells from cracking due to sudden temperature drops and guarantees the centers are dry and crispy, not chewy and wet.
My Ultimate Meringue Disasters
The first time I attempted meringues, I used a plastic bowl that I had previously used to mix a heavy buttercream frosting. Even though I washed it with soap, there was microscopic fat trapped in the plastic. I beat the egg whites for twenty straight minutes, and they never moved past a sad, bubbly soup. I had to throw it all down the sink. Metal or glass bowls only, scrubbed with vinegar.
My second massive failure was using cheap liquid food coloring instead of gel dye. Liquid food coloring is basically just colored water. When I piped the meringue onto the pan, the water in the dye instantly dissolved the sugar in the meringue. The beautiful star shapes collapsed into flat, runny, weirdly-colored puddles before they even hit the oven. You must use thick gel food coloring.
Frequently Asked Questions (FAQ)
Why are my meringues weeping sticky syrup out of the bottom?
You failed to dissolve the sugar completely during the mixing phase, or it is raining outside. If you dumped the sugar in too fast, undissolved crystals sink to the bottom in the oven and melt into a sticky, wet syrup (called “weeping”). Furthermore, sugar is highly hygroscopic (it absorbs water from the air). If you bake these on a humid, rainy day, they will literally suck moisture out of the air and turn into a sticky mess. Only bake meringues on dry days.
Can I flavor these with cocoa powder instead of peppermint?
Yes, but you have to be careful. Cocoa powder contains natural fat (cocoa butter). If you aggressively stir cocoa powder into the meringue, the fat will instantly deflate the egg whites. You must gently fold exactly 2 tablespoons of sifted cocoa powder into the final stiff meringue with a rubber spatula, stopping while it is still marbled.
How do I store them so they stay crunchy?
Air is the enemy. The second they are completely cool, immediately transfer them to an airtight Tupperware container or a heavy glass jar with a rubber seal. Keep them on the counter at room temperature. Do not ever put meringues in the refrigerator. The fridge is a damp, humid box that will instantly dissolve the crispy shells and turn them into sticky, chewy gum.
Flavor Variations and Upgrades
The Chocolate Dipped Base: Once the meringues are completely baked, dry, and cooled, melt 1/2 cup of high-quality dark chocolate chips with a tiny drop of coconut oil. Gently dip the flat bottom of every single meringue kiss into the dark chocolate, and place them on wax paper to set. The bitter chocolate perfectly grounds the intense sugar of the cookie.
The Eggnog Spice: Skip the peppermint extract and the red/green dye. Add 1 teaspoon of pure vanilla extract and 1/4 teaspoon of rum extract. Right before they go into the oven, heavily dust the raw white meringue kisses with freshly grated nutmeg. They taste exactly like a cup of spiked holiday eggnog.
The Peppermint Crunch: If the painted stripes aren’t visually aggressive enough for you, pipe the meringues pure white. Then, while the piped batter is still wet and raw on the pan, violently throw heavily crushed, sharp candy cane shards directly over the tops of the kisses. The candy melts into the meringue in the oven, creating a massive crunch.
Cook With Us Daily · Christmas Meringue Kisses — 40 kisses · 15 kcal each
🎄 Cook With Us Daily · Holiday Candy
Christmas Meringue Kisses
Ingredients
01The Cloud Base
The Striped Paint
Kitchen Tools
02Directions
03The Vinegar Scrub
Take a paper towel soaked in white vinegar and aggressively scrub the inside of your glass or metal mixing bowl and the whisk attachments, then dry everything completely with a clean towel. The acid strips away hidden fat molecules — a single drop of yolk or a microscopic smear of butter and the whites will physically refuse to whip. Never use a plastic bowl; plastic is porous and traps grease permanently.
The Initial Whip
Preheat the oven to 225°F (105°C) and line two large, heavy metal baking sheets with parchment paper. Pour the room-temperature, freshly separated egg whites into the pristine bowl with the cream of tartar and the pinch of salt. Beat on medium speed until the whites are frothy and completely opaque white.
The Slow Sugar Feed
Turn the mixer to medium-high and add the sugar exactly one tablespoon at a time, letting each spoonful beat about 15 seconds before the next. Dumping it all in at once crushes the air bubbles, and undissolved crystals sink and weep sticky syrup in the oven. Add the peppermint extract, then beat on high for 5 to 7 minutes — it must form thick, dense, incredibly glossy stiff peaks that stand straight up when you pull the whisk out.
Paint the Bag
Fit a clear piping bag with a large star tip (like a Wilton 1M) and fold the top over your hand. Dip a small, clean, food-safe paintbrush into the red gel food coloring and forcefully paint two thick stripes straight down the inside walls of the bag. Repeat with the green gel dye.
The Pipe
Gently scoop the stiff white meringue into the painted bag — do not overfill it. Hold the bag perfectly vertical over the parchment, squeeze forcefully until a 1-inch wide star forms on the paper, push down slightly, then pull straight up to create a sharp, pointed kiss. The white meringue drags the red and green dye out of the bag as you pipe, creating the candy-cane stripes.
The Dehydration
Bake at 225°F (105°C) for exactly 60 minutes — this is dehydration, not baking — and do not open the oven door. Turn the oven completely off and leave the pans sitting in the closed, cooling oven for 1 more hour, so the delicate shells don’t crack and the centers dry crispy instead of chewy. Bake on a dry day — sugar is hygroscopic, and humid air turns the shells sticky.
Nutrition
04| Nutrient | Per kiss (1 of 40) |
|---|---|
| Calories | 15 |
| Protein | 0 g |
| Carbohydrates | 4 g |
| Dietary Fiber | 0 g |
| Total Sugars | 4 g |
| Fat | 0 g |
| Saturated Fat | 0 g |
| Sodium | 5 mg |